
Pentair IntelliFlo3 and IntelliPro3 Pumps
The current IntelliFlo generation takes a two-conductor RS-485 run straight from its own terminal block to a PORT. The wiring is the easy part — the requirement that catches installers is that the pump must be powered continuously once automation owns it.
The connection
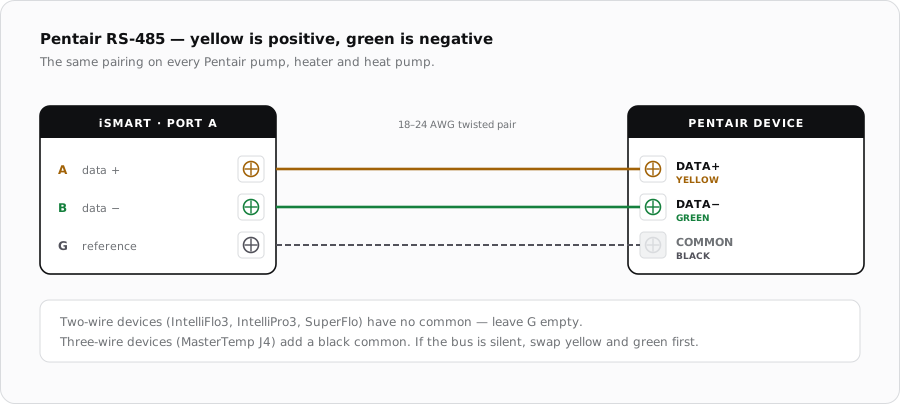
IntelliFlo3 VSF and IntelliPro3 VSF pumps carry an RS-485 terminal block behind the wiring cover, marked DATA+ and DATA-. Pentair specifies an 18 to 24 AWG two-conductor cable. There is no separate common on this connection — two wires is the whole run.
| Pentair | Colour | iSmart Module |
|---|---|---|
| DATA+ / A | Yellow | PORT terminal A |
| DATA- / B | Green | PORT terminal B |
Continuous power is mandatory
This is a common retrofit trap: the existing installation often has the pump on a switched leg from a mechanical time clock. That has to be undone before the pump can be driven over the bus.
What changes once automation takes over
- All pump control passes to the automation system.
- The Pentair Pool app shows a message confirming the pump is under automation control.
- Putting the automation system into service mode hands control back to the pump, which is the route to running it locally for maintenance.
Cable
- 18-24 AWG, two conductors, shielded and twisted.
- Keep DATA+ and DATA- as the two halves of one twisted pair.
- Ground the shield at the iSmart Module end only.
- Run it separately from the pump's power wiring.
Program the drive before handing it over
A correctly wired pump can still appear broken for the first ten minutes after power-up. The pump obeys its own stored settings before it obeys anything on the bus, so its schedules and its priming cycle have to be cleared out before the module takes over. All of this is done in the Pentair Pool app, on the pump — none of it can be done from the iSmart Module.
- 1
Connect the pump in the Pentair Pool app
Open the app and pair with the pump if it is not already connected. Everything below happens here rather than on the module.
- 2
Delete the pump's own programs
Open Program 1, tap Edit, scroll to the bottom and tap Remove Program. Repeat for any other stored programs. Pentair requires that schedules set in the app or on the drive touchscreen be deleted when an external system is driving the pump, otherwise the two fight over the same speeds.
- 3
Turn priming off
Go to Pump Dashboard, Device Settings, then Priming Parameters. Set the priming Enabled/Disabled option to disabled, and disable Dry Run Detection as well. Save before leaving the screen.
- 4
Set the automation address
Under Device Settings, open Automation Configuration and set the pump address. It must match the address the iSmart Module expects — Pentair is explicit that a mismatch means no communication at all. The pump ships on address 1.
- 5
Remove the device from the app
Scroll to the bottom of the settings and select Remove Device. This releases the pump from the app so control passes cleanly to the module.
- 6
Check the CONNECT LED
Power up and confirm the CONNECT LED is solid magenta/pink. That is the pump reporting that automated control is active, and it is the fastest confirmation that the handover worked.
Reading the drive LEDs
The CONNECT, ON/STOP and QUICK CLEAN buttons each carry an indicator. Two of them answer most commissioning questions without opening an app at all.
| Button | Colour | Behaviour | Indicates |
|---|---|---|---|
| CONNECT | Magenta/Pink | Solid | Automated control is active |
| CONNECT | Magenta/Pink | Pulsing | Connected to automation, in service mode |
| CONNECT | Green | Solid | Active WiFi connection |
| CONNECT | Green | Pulsing | Searching for WiFi |
| CONNECT | Blue | Solid | Active Bluetooth connection |
| CONNECT | Blue | Blinking | Searching for Bluetooth |
| CONNECT | Yellow | Pulsing | Pump requires provisioning |
| CONNECT | Yellow | Blinking | Pump update in progress |
| ON/STOP | Green | Solid | Pump running |
| ON/STOP | Green | Blinking | Priming cycle — priming is still enabled |
| ON/STOP | Green | Pulsing | Pump in thermal mode |
| ON/STOP | Yellow | Solid | Pump is idle |
| ON/STOP | Red | Solid | Pump disabled — press ON/STOP to re-enable |
| ON/STOP | Red | Blinking | Alarm detected |
| ON/STOP | Green/Yellow | Blinking | Warning detected |
When it does not come up
| Symptom | Where to look first |
|---|---|
| No response at all | Swap DATA+ and DATA-, then confirm the pump has power. |
| Pump reachable but will not start | Its supply is being switched somewhere upstream. Automation needs it live continuously. |
| Control works, then stops after a service visit | The automation system was left in service mode, which returns control to the pump. |
| Drops out intermittently | Pair split across two twisted pairs, or a shield grounded at both ends. |
Sources
- Pentair, IntelliFlo3 VSF / IntelliPro3 VSF Installation and Maintenance Guide — DATA+ / DATA- terminals, wire colours, conductor sizing and the continuous-power requirement
- iSmart Module relay driver board — KiCad schematic and BOM. PORT A-D are an unbuffered RS-485 pass-through carrying A, B and G; H1/H2 and AUX1/AUX2 are optocoupled dry relay contacts